Sampling depth Sampling area Sample care Testing More information
David Lockwood, University of Tennessee / University of Georgia
Preplant and postplant soil testing are essential parts of a good vineyard nutrition management program. Soil testing several months to a year or more in advance of planting will permit application and incorporation of lime and/or needed nutrients to create a favorable environment for vine growth following planting. Periodic soil testing following vineyard establishment is important in determining and maintaining a desirable soil pH in the upper few inches of soil. Soil pH determination is of value as an aid in interpreting plant tissue analysis and in formulating a good vineyard fertilization program. Keep in mind that the validity of the soil test results are dependent on the care taken in collecting and submitting the samples. Consider the following points when collecting soil samples:
Depth to sample –
- pre-plant: Pull a sample from the upper eight inches of soil and a second sample from the 8 to 16-inch soil depth. While grape roots in many soils will penetrate beyond 16 inches, it’s very difficult to incorporate desired materials below this depth. For shallow samples, discard the top inch of soil, as plant debris and other contaminants on the soil surface may adulterate the sample and skew the results.
- post-plant: Collect soil samples from the upper 8 inches of soil and discard the top one inch. Incorporation of lime and/or nutrients in the subsoil is difficult or impossible to accomplish without doing considerable damage to the root system of the vines. However, collecting soil samples at the 8- to 16-inch depth in an established vineyard is still worthwhile, as knowledge of subsoil pH can be of value in interpreting plant tissue analysis results.
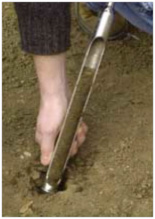
Area to sample – Take separate samples from areas where apparent differences in soil conditions exist. Look for differences in soil color or differences in the type and growth of vegetation in the area. Even where soil types are fairly uniform, a single soil sample to be sent in for analysis should not represent over 10 acres. Within the area used for a single sample, collect upwards of 20 subsamples from each depth. Samples may be collected using a soil probe or by using a shovel and taking a thin slice of soil. Collect samples when the soil is moist, but not wet. Fall is often a good time to collect soil samples.
Care of samples – Put subsamples from the upper 8-inch level into a clean plastic bucket and mix thoroughly. Discard plant litter, pebbles, and stones. Select about one cup of soil from this mixture to be submitted to the laboratory for analysis. Handle subsamples from the 8- to 16-inch depth the same way. Sample containers for university labs may be available from your county extension office. Clearly label sample boxes and keep a log of samples being submitted for reference once results are received.
Make a map of the areas where samples are collected. Use the same information as on sample boxes to enable accurate identification, and therefore treatment, of areas having different lime/nutrient needs.
What to test for? Soil pH, phosphorus, potassium, magnesium, calcium, iron, zinc, and boron levels are of interest in a preplant soil sample. The correlation between soil test and tissue test results is not strong. The primary benefit of postplant soil testing is pH determination, therefore, the basic test is generally all that is needed.
Additional information on collecting soil samples and interpretation of test results may be obtained at your local extension office.
Recommended Resources
Causes of Poor Fruit Set in Grapes
Monitoring Grapevine Nutrition
Collecting a Soil Sample video
Soil Testing video, Cornell University
Reviewed by Tim Martinson, Cornell University and Eric Stafne, Mississippi State University

